Past few days I've been, literally as we call it.. 'Making meters'. Which means that I've been concentrating myself rather more on quantity than quality. My job for this week is to create 9 mockup levels for a new project. Priority number one for me was to get it done as quickly as possible, so that the programmers could continue developing the game itself.
I started by blocking out the levels with 3D tiles we already had from another project. This saved me a lot of time. Using the tiles I was able to block out the 9 mockups. My main focus was.. well to be honest getting myself 9 mockup levels up and running at the end of the week in the first place.
Then, our Game/Level designer is the one to decide if a mockup level's design is good enough or not. He then gives feedback on what to change and add or remove from the mockup. I mean things like: Making the level longer/shorter, making the level going uphill or downhill, adding trees, removing trees, adding/removing a rock here and there etc.
The next step is to finalize the mockups into final levels. This is what I'm currently working on. Trying to change/improve the mockups as much and as fast as possible following the feedback the designer gave me. I'm not able to work on the placement of every rock or tree.. since the final levels should be done this Friday.. And with this project we really have little time to do it. So having the 9 levels all operational is priority number one :)!
Last night we all went to the movie 'New Kids: Nitro'. This movie is uhm.. not sure how to describe this.. strange, hilarious and fun. I think you need to be Dutch to understand it. Anyway, it is about a group of friends who live in a small town called 'Maaskantje'. They are to say the least, not the smartest and wisest people on the planet and they are in a fight with a near by town called 'Schijndel'. Maybe you just have to see it for yourself, see the trailer below:
This is my first post for the blog so I will introduce myself. I’m Michael, new programmer at Xform, started at the same time as Eugene and also worked on the same projects. It’s no coincidence that we started at the same time, because we are brothers. We studied together and done most of our projects together. Also we did our first internship together at Xform. And since then we got ruined by them. And there is no way to undo that so, only one option remains.. Join them!
So we started our first project "Earth A.D."! Uhh?! "Earth A.D." yeah also known as "Shootin’ Cybertrash". The idea was to create the best "web based side scrolling gun and run action shooter game"! A side scroller which has the elements of the good old NES/SNES games.. A game which you really need to play over and over again to become good at. Remember positions of pickups, weapons, enemies. So basically hard as hell, but super fun to play. Can't remember how many games I played on those consoles but some of those titles I do remember. One of those games which also is our main reference is "Contra"! That franchise is super awesome, play as "Rambo" with a HUGE gun and shoot everything to damnation! Every alien, robot or evil being will be blown to bits with your super gun that can switch from normal fire to a flamethrower/ rocket launcher etc.. Took a while to finish it on the NES but it was worth it. Still got the game for my NES, still play it sometime to just get the feeling back of the good old games :P
But enough about "Contra", I was talking about "Shootin Cybertrash"! Hell yeah! We got some nice reference for the game and a nice idea about it. So then "Earth A.D." was created..
We wanted to make it even more difficult then "Contra", so we started to make some mockups with hordes of enemies.."Serious Sam" but then side scrolling :P You think the first level is hard now? In the beginning it was insane! Overdid it too much so we redid it until a hard level was created, but not too impossible :) After a while we needed a more catchy name so "Earth A.D." became "Shootin Cybertrash"!
Some tips.. Just play it a lot and learn their actions and try to dodge their bullets, it's possible, go and see the trailer below! And play the game here!
I'm back. With a brand new post. About fans. Not the ones that are standing outside right now, waiting for us to leave the office, screaming our names real loud while taking pictures. But the ones that are truly dedicated to our games.
Fanbase Yesterday we were having a social media meeting. We have these meetings on regular intervals to evaluate and schedule the online activities of Xform. One of the recurrent topics is our fanbase. A few months ago I posted about the importance of your target audience. Knowing who your target audience is is really important during the development process. But after the game is released it's still interesting to follow them. You can track down all kind of info by using site statistics. But another way to learn more about them is to listen what they say. Or even more interesting... see what they create!
Burnin' Rubber Fanvids
Uploading our content A fun way to take a closer look at the Xform fanbase is to spend some time on YouTube. If you start watching our game trailers on this channel you will also notice a huge variety of homemade fanvideos from our players. There are Xform gameplay videos, reviews and How To's. They differ considerably in length and quality, but that doesn't matter. The fact that someone takes the time to create a (simple) video about your game to share it with others is very flattering. In fact, it's like a tribute.
How to... Defeat the baboon boss in Rhino Rush:
Area Zero review: (You don't have to understand the language to hear that this guy is really excited!)
And of course some gameplay footage of the extremely popular Burnin' Rubber series:
The value of fanvids The biggest value of a fanvid is that it shares your game content. It's a way of free publicity. This means it can attract new players to your game. Any publicity will do. In fact a negative review of your game can attract even more players, because they want to check by themselves if a game is really that bad. An interesting thing happened with the Burnin' Rubber videos that show game glitches. Apparently people find it funny to see things that go wrong. Because instead of keeping talking about these glitches, other fans started to upload their Burnin' Rubber glitches as well! Another important thing is that fans start to communicate with eachother through the videos. They leave comments, ask for help or give tips and tricks. Based on their discussions you can find out what they like or don't like about your game. And you can use this information for new games. We noticed that some of our games have a lot of fanvids, others have less. And of course we want to know why this is. So the next weeks I'm going to do some more research on this subject. But now... it's weekend time! Feel free to add new Xform fanvids to YouTube. We love them. The more the better!
In my current project I needed to have a ray from the camera on the point where the mouse was on the screen. The problem here is: how do we get a three dimensional ray from a 2 dimensional point?
To understand how this is done, you need to know a little about the transformation pipeline, these are a couple of matrices together which convert a vertex position in 3D to a point position on the screen.
The transformation pipeline.
To specify viewing, modeling, and projection transformations, you construct a 4x4 matrix M, which is then multiplied by the coordinates of each vertex v in the scene to accomplish the transformation. The viewing and modeling transformations specified are combined to form the modelview matrix, which is applied to the incoming object coordinates to yield eye coordinates. Next, if you've specified additional clipping planes to remove certain objects from the scene or to provide cutaway views of objects, these clipping planes are applied. After that the projection matrix is applied to yield clip coordinates. This transformation defines a viewing volume: objects outside this volume are clipped so that they're not drawn in the final scene. After this perspective division is done to produce normalized device coordinates. Finally, the transformed coordinates are converted to window coordinates by applying the viewport transformation. The dimensions of the viewport can be manipulated to cause the final image to be enlarged, shrunk, or stretched.
Now when we wish to get a three dimensional ray from a 2 dimensional point, we go the other way around all the way to the eye coordinates. What we actually get is a 3 dimensional point located on the near plane of the viewing volume, but from this we can calculate a ray from the camera.
Point (sx,sy) on screen, to point (wx,wy,wz) and ray from camera.
When starting a new game project we usually make up a working title without putting any good thought into it, often it's just the first thing that comes to mind or just something stupid/generic.
Some working title examples of our games are:
"Blaster" for "Area Zero" (nice and generic)
"Super Racert" - "Power Driving" (Yes the "t" is intended)
"Super Kart Game" for "Go Kart Go! Turbo" (Super Mario Kart was already taken apparently)
"DressUp Game" for "Girly Trends 3D" (another great generic working title)
"Joep VS The army of the Damned" for "Army of the Damned" (for the record: Joep is our technical artist)
"Ground Zero" for "Traffic Slam" (Guess we can't use that name anymore since 9-11)
"Jetski Game" for "Hydro Storm" (Couldn't use the term Jetski in the name because it's originally a brand name)
To come up with a working title is easy but to come up with a final name can be quite hard, this is also the case for our "snowboard game with cars" we're currently developing.
Last week I needed to update the game logo which currently reads "Auto Games" to a more final design, I needed the game's final name to do this. In order to come up with a name all Xform employees have the opportunity send in suggestions which for 99 percent are totally stupid or unusable like "Super Car Olympics 2011 Deluxe Edition".
We do collect all these suggestions and start making lists with associative words. For example we know the game takes place on snow covered mountain tops so words like "snow, piste, mountain, snowstorm, deep, cliff, steep" are written down in a list. When the list is completed we start mixing these words and making different combinations and see or they match the game.
For "Auto Games" we came up with "Snow Stunt Heroes", this name focuses games stunts and drivers instead of the cars. The word snow is added to give a hint in what sort of environment the game takes place.
Finally the client has to approve this title, we'll know if this is the games final name at the end of this week, otherwise we're back to making lists.
Last couple of weeks I have been working on the super awesome snow game with cars! It will rock!
I’m going to show you one of the cars I have been working on.
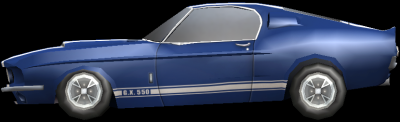
The idea was to have a big car in the game like a truck or a pick-up.
First I started to look for some reference before rushing into 3DS Max.
After collecting tons of pictures of pick-up trucks I’ve chosen a couple pictures to be my main reference. Now I can finally start modelling the pick-up truck!
I used a blue print of a pick-up truck for the silhouette.
After this I added some details, bumpers, rear lights, front window, etc.
Now the most fun part of all! I had to “Cartoonify” it! Hehe.
First I had to take of the roof! And make it a Pick-up convertible,
ever saw something like that? :P
To make things more Cartoony, I had to make things out of proportion,
over exaggerated some details.
To give it a big and clumsy look, I made the bumpers way bigger, added a broken license plate, made the lights and side bars bigger.
I added two vertical truck exhausts for a more tougher look.
And this is the screenshot of the outcome when I was done!
The texture will do the rest and finishes the job.
But you will see that later!
This week I've been working on character animations for our top secret SSX-with-cars project.
Character animations in 3D are most of the time done by using a relatively simple skeleton, matching the general shape of the character's mesh. These skeletons include all of the important joints that are needed to create the required deformations. The mesh of the character itself is linked to such skeleton. When a bone moves, the related vertices of the mesh move with it. The proces of linking the vertices of a mesh to such a skeleton and the creation of a skeleton itself is called 'rigging'. After the character model is rigged properly, we can animate it.
The animations are created by making keyframes of the skeleton, not the mesh. A keyframe in 3D is basically a pose of the skeleton at a specific time. I always start by creating the most extreme poses of the animation. For example, I was working on an animation where two characters were highfive-ing:
Click to see animated GIF
I created the starting pose and the pose where the two hit eachother with their hands. These two keyframes are seperated by empty frames. The computer calculates the motion between these poses/keyframes. At this point we only have the motion and timing of the animations but it is far from finished. The motions of a bone from one keyframe to another can be displayed by showing its trajectory. These are pretty much straight, from one point in 3D to another. But when having the highfive animation, I want the arms to swing. Therefor I have to adjust the trajectory. This can be done by adding extra keyframes in between. This adjusts the curve of the motion. Most of the time I use only one extra frame, because adding too much frames can cause jittering and unsmooth motion.
Today I'm going to write about faking car physics, in particular adding a sense of weight to the car. What I mean by this is as follows: when you see a car breaking you'll notice how the car tilts forward as the center of mass moves forward. In the same way when a car accelerates you'll see how it tilts backwards. Likewise when a car turns left, it banks rights and vice versa. See these images:
Car tilting forward
Car tilting sideways
To fake this effect I'm applying two extra forces on the car: one force that lifts the car and one force that pushes the car down. The trick is to find the proper points.
See the following image:
Applying a lifting force (arrow up) and pushing force (arrow down).
Here we have a lifting and pushing force that are moved along the red circle. The lifting force is always directly on the opposite side of the pushing force on the circle. In this particular situation we are pushing the nose down and lifting the back which corresponds to a car that is decelerating. Other situations can be done in the same manner.
So now, given the car speed in global coordinates, how do we find where we position the lifting (and pushing force)? First we store the difference in speed between the last frame and the current frame: this is our deceleration/acceleration vector and determines where we are going to apply our force. This vector should be in car space (not global space) and determines where we apply the lifting force. The larger the length of the deceleration/acceleration vector the stronger the lifting force. At exactly the other side (simply multiply the position of the lifting force by -1) we apply pushing force with the same strength.
This should already work nicely, but a problem with the circle is that the car is longer than it is wide, as a result if we apply the same forces the car will bank too much and even flip the car. So we have to correct for this by either changing the forces when they're applied near the side of the car or change the circle to an ellipsoid. Either should work fine.
Today I want to tell you something about task management. Maybe it's not the most exciting subject, but it's something (game) projects simply can't do without.
And in the end... you're glad you're using it!
But first I like to start with an update about the good stuff of the Xform life this week:
- Watching Gremlins during our lunch breaks.
- Eating some very delicious cake.
- Our intern Sander passed his drivers test.
- We found a dead rat in our office.
- We're working on 6 new awesome browsergames!
And with this last point we're back on topic: task management. Because Xform is a small company, most of the time the people here are working on more than one game project.
When working on a project, for you it can be quit simple to remember what you have to do and in what order. But when you're part of a team not only your tasks that need to be done. Everyone has his own list of activities. This means you'll need someone that can keep the overview. And for our game projects it's my job to do that. Sounds easy. It's not. 'Cause when there's too much to do (and believe me, there always is) it can get quite a mess.
For example: at this moment we're working on one of our new car games. Although there are just a few days before we reach the Beta milestone, there are still 36 tasks to do. Try to memorize 36 things that need to be done, in the right order. You simply can't. That's why we use Intervals, project management software that helps me to control all tasks and milestones.
To manage tasks you need to know exactly:
1. What needs to be done.
2. Who has to do it.
3. When it must be completed.
Tasks always take time. Even the small ones. And it's those little activities that are easy to forget. When you start with task management it feels weird to schedule tasks that only take less than half an hour. But they're part of the project, so they need to be managed as well.
That's why we at Xform don't only schedule our milestones. We schedule every (!) single, little task. This gives me a complete overview of the entire project and I can easily see what's finished and what still needs to to be done.
In between all the management stuff, I still find some time to create the game trailers.
Here's the one of Area Zero:
A few posts back I mentioned we were working on a new game prototype which was basically a downhill ski-game with a special twist. Well the special twist is that in this game you're driving a car downhill while slaloming, grinding and jumping insane ramps!! It's like SSX but with cars!
The prototype proved to be quite fun to play so we got a go on this project.
There was one problem we've soon noticed while playing the prototype: the car stunts looked a bit boring when the cars only turned, rolled and twisted in the air. It missed that extra wow factor you need in an "extreme sports" game like this.
Another problem is that cars can't really give the player any feedback when successfully performing a stunt, we could have shown some sparks or particles but that wouldn't look very impressive.
Then someone here got the ingenious idea to turn the cars into cabriolets and put two characters inside. Now we're not only limited to car stunts but we can also add character stunts and even combine them. This change made the game instantly more fun to play and by adding the characters we can give the player much more feedback by making them wave, cheer and shout. It also adds to the overall arcady feel of the game.
Work in progress image of the two characters inside a dummy car.
One of the drawbacks is that this decision does add to the complexity of the game, beside relatively simple the car animations we also have to animate two separate characters which also have to interact with the car and each other. We do think this extra effort will set this game apart and make it much more attractive and fun to play, I guess we'll know in a few weeks when the game is released.
Let me first introduce myself, my name is Eugène and I now work at Xform for several months as a 2D/3D Artist and it’s a hell of a job! :D
I’m going to tell you about my first project here. It is an unannounced game, not released yet. I am not sure if I can talk about it or show much of it.
But what I can tell it’s a “Browser Based Side Scrolling Gun and Run Action Shooter” game with 3D graphics! We tried to give you the feeling that you are playing an old school 2D Shooter game of the Nes/Snes era! So expect a difficult game!
It takes place in a destroyed Earth and you have to make your way through hordes of enemies and tons of explosions with a kick ass character! This game will rock! Ha!
For this project I’ve been working on the levels, menu’s, modelling and texturing stuff, placing dummies (enemies in game) etc. In every level you will face enemies, hard jumps, upgrades and more. Some enemies are placed in really sneaky places where you don’t expect them!
Here is a sneak peak of one of the levels.
This is a print screen of my viewport in 3DS Max. You can see some dummies which are in the game enemies. The big blue boxes are “camera triggers”. If u pass these objects (you won’t see them in game so don’t worry) the camera will zoom towards or away from the player to gain a better view of your surroundings and what lies ahead. The explosive objects.... I think those things don’t need any explanation of what they do!
This game is going to be called “Shootin’Cybertrash”. We will keep you updated about this project. And wish you all good luck in completing this hard game hehe, when it is released of course. J
Well this was a little introduction of myself and the game where I’ve been working on. Next time I’m going to talk about the project where I’m working on now.
This week I've been working on a 3d mockup environment for a new project. It is going to be a car game. I can't tell you that much about it yet though.
The game does feature big jumps, they are actually a big part of the game. These jumps should be easy, spectacular and inviting for the player to take. The player should be able to just drive on a ramp, perform the jump and land almost perfectly on the other end without much of trouble to continue driving. It was my job to test several jump setups using the mockup to see what kind of distances, heights and speeds we should use. We also wanted the jumps not to be too low in height, it should look spectacular!
The first step I took was to gather information of what we already got. I already had a test version of the game with the main physics up and running, so I could check how the car behaves on the mockup. I knew that our car has a certain speed at the moment of jumping, behaves in a certain way in the air and while landing. I was not able to change the car speeds/handling for this test. I started by just setting up a simple jump over an imaginary river or cliff. I used big numbers to quickly test what works and what doesn't. For example, the first jump I made was planned to be 10 meters in length. This jump felt way to short, I instantly jumped over the landing zone. Therefor I increased the length by, easy numbers, 10 meters. So now I had a jump of 20 meters in length.
This was already more like it, but still a bit to short. Most of the time I still landed to far over the landing zone, so the distance wasn't far enough and I increased it by another 10 meters. This did the trick and I was now able to land pretty much perfect in the planned landing zone. However I wasn't pleased by the height of the jump, it wasn't high enough. I started tweaking the ramp, to get more height out of it. First I tried 'straight' ramps, not curved. This worked fairly well but gave a harsh ' bump' while driving on the ramp when it got steeper. Curved ramps was the solution, and gave the car a smooth ride into the air.
Now the jump was looking good and it felt 'big'. However changing the height of the jump also influences the jump distance. I reduced the jump length by 5 meters, and reduced the angle of the ramp slighty which gave a perfect jump with good height. The hard part is to give the player enough air time to enjoy the view as well as making the jump not to short in length. I hope to be able to tell you more about this game soon, it is going to be a pretty interesting project :)!
It’s been a long time since I wrote something. Too be honest I didn’t have anything worthwhile to write about as I was hands deep in deploying our new augmented reality kart racer. Play it on www.redbullformulaface.com. It is great fun!
At the moment I have a bit more time to look into other things. A couple of years ago we did a small kart game (http://www.shockwave3d.com/gamepage.cfm?id=794) which was extremely fun to work on.
The last few years we occasionally put some time into expanding it, so we have quite some stuff lying around to make a ‘new’ game. Well, we’re not actually remaking it… it is not really a sequel… it is more a ‘rebuild’ with additional stuff. Nevertheless, it was time to finally upgrade and implement skidmarks!
I’ve been tackling skidmarks for quite a while now. I found it to be harder than I would like. Not really the technique behind it, but more in an Adobe Director kinda way. There were three options I looked into.
1.Create small transparent planes at the bottom of each wheel. Place them each frame or after a certain threshold distance compared to its last stored position.
2.Draw into a texture. Have an additional texture layer and paint in it where the wheels are. If you have a lightmap texture you could also draw into that one, I think.
3.Build a mesh trail.
Honestly I didn’t do any real stress testing on the first two as I already knew they weren’t really viable. Although I’d really like solution 2. In the end there shouldn’t be any performance issues on how many skidmarks you have and above all they will be displayed indefinitely! Solution 1 and 3 need to be ‘tempered’ so performance won’t drop too much. Unfortunately, I still think it might be too slow to do any additional raycasting and lookups to know where you should draw into the texture. Furthermore, you can’t directly draw to any texture in the VRAM in Director, so when updating skidmarks you constantly have to send the texture to the VRAM as well. You’d also want a decent texture resolution or else your skidmarks would look like huge blobs. All in all this will cost too much CPU power and performance will drop. A cool solution, but currently not feasible. I went with the 3rd option.
A couple of our games feature rockets. The rockets leave a trail behind when fired. I used this as a base to create a skidmark feature. The very first version of this effect would rebuild an entire mesh each frame (or each update). Meaning the mesh could become very large, complex and time consuming to update. I rebuild this effect with two optimizations.
1.The mesh uses a maximum amount of vertices and faces. It is created as a long segmented plane. I build this mesh beforehand (or sometimes I store more of them to be used and reused) so we can avoid any performance drop when creating a skidmark. The downside is that the mesh and detail is limited. So a trail or skidmark cannot be very long. The mesh will also get 2 sets of texturecoordinates (and a new shader). The first layer is a tileable texture. The second one a transparent texture (a gradient), so we can fade the trail at the end.
2.All vertices are initially placed at the location where they should spawn. Each frame (or update) all 2 vertices (of each segment) will get the position of the 2 vertices (previous segment) before them in their vertex list. So i.e. vertex 5 and 6 will get position 3 and 4. The only exceptions are vertex 1 and 2. This will be set to the source of the trail/skidmark. So each update we 'move' the mesh 'along' the previously stored positions.
These updates made it much faster. So ‘fast’ that at my current work machine I can have multiple sets of skidmarks for 8 cars at the same time. Not sure if this will make it into the final game, but it is worth testing J
Today I'd like to write about a little math problem. Pieter came to me asking if I could find a function with some desired properties. To give a simple example of why this could be useful: Suppose you want to make an animation of an object bouncing by simply changing the y position of the object. For this you could use a function that given a certain time in the animation returns you a number which you can use as the y position of the object. You can easily control the animation by adjusting the function and you can also easily skip to any part of the animation.
Now for the problem: Pieter wanted a function f(x) where the following properties hold: f(0) = 1, f(10) = 10 and somewhere between x = 0 and x = 10, let's call this t, the function should reach it maximum point at 12, so f(t) = 12. The image below shows the function he was roughly looking for:
The red line shows the possible function. The blue dots represent f(0) = 1 and f(10) = 10. The green line represent y = 12 where the function should reach it's maximum, we call this value t.
Now we could of course use a spline that is fitted to the function, but this is not as efficient (or as fun) as a parabola. A parabola is a second degree function of the form: f(x) = ax^2 + bx + c. So how do we find the a, b and c values? We start by substitution of the desired points. For f(0) = 1, this becomes: f(0) = c = 1. So c = 1, that was easy. Now for f(10) = 10: f(10) = 100a + 10b + 1 = 10, simplified to: 100a + 10b = 9. We have 2 variables here and only 1 equation, to solve for a and b we will need another equation. The problem now is that we don't know a third point which would give us another equation. We could try to just guess a point, for example f(6) = 12, but the resulting function will not have it's maximum at y = 12, but higher.
The crucial thing here is to realize that when we reach a maximum the derivative of the function in that point is exactly 0. For a parabola the derivative is of the form: f'(x) = 2ax + b. We can use this to get another equation as we want to reach our maximum at t (it does not matter where t lies as long as it's between 0 and 10). So we want that f'(t) = 0. Using substitution we get: f'(t) = 2at + b = 0. Good, now we have the 2nd equation we were looking for and can solve for a and b you might think. But unfortunately we've added another variable t, so now we have 3 variables and 2 equations! That didn't seem to help us very much then... But wait :) Let us now try to express a and b using t. Using the equations 100a + 10b = 9 and 2at + b = 0, we can express b as b = -2at, plug this into the first equation to get 100a - 20at = 9, from which we get that a = 9 / (100-20t). We can then substitute a into b = -2at to get b = -18t/(100-20t). So now we have our a and b expressed as t to get the following function: f(x) = (9 / (100-20t)) x^2 -18t / (100-20t) x + 1.
Now remember that t is the point where the function has its maximum which we want to be at 12, we can express this as: f(t) = 12. From this we get another equation: f(t) = (9 / (100-20t)) t^2 -18t / (100-20t) t + 1 = 12. We simplify this and get: -9t^2 + 220t - 1100 = 0. We solve this using the abc-formula and obtain two values for t, namely t1 = 7.011 and t2 = 17.43. Clearly t2 is not between 0 and 10, so we pick t = t1 = 7.011. We then plug t in to a and b and get the final function: f(x) = -0.22377 x^2 + 3.13769 x + 1. Which can be seen here:
The final function with the desired properties: f(x) = -0.22377 x^2 + 3.13769 x + 1
This week I worked on some bugs of the robot shooter. There was a descent list of fixes, tweaks and optimalizations after the first QA session. The last one, optimalization is what I want to talk about today. In this case I want to look into simple, or high level optimalizations.
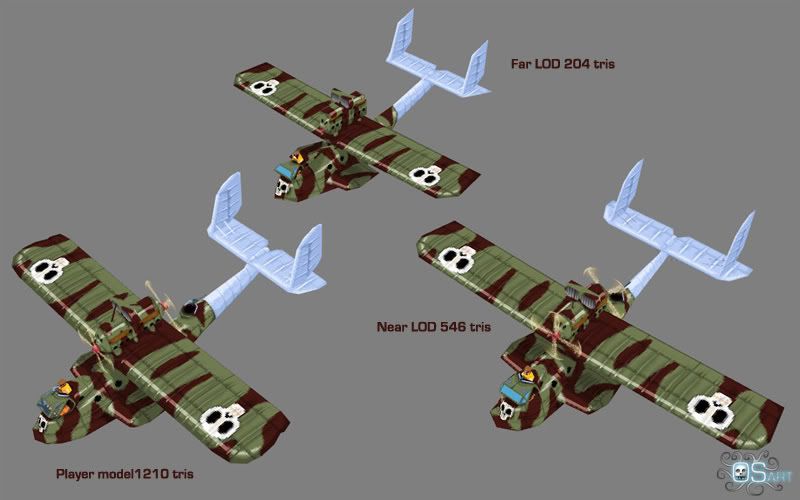
First some theory to start with. Games in general are rendered realtime to your screen and displayed using 'pixels'. Imagine having a 3D model displayed close to the camera. It fills up a lot of pixels with its shape, texture and polygons, because it is relatively close to the camera. We could say that how closer the 3D model is towards the camera, the more pixels it uses to display itself. Since it uses so many pixels, we are able to see all of the details of the model.
Now, when moving the 3D model away from the camera, it eats up less pixels to draw itself. Sounds logic right? This means that a single pixel on our display covers up some of the detail we have in the 3D model. We could say that the model is less detailed displayed than it actually is. While it is still being processed the sameway, with all of its details. Which actually costs performance. Therefor we could replace the model by lower resolution version of itself, if the model is on a certain distance. A system like this could be called a 'LOD', or 'Level Of Detail', system.
In our robot shooter it is possible to turn on pixel shaders, which is render bit slower than the regular hardware shaders. In fact, when playing with a descent amount of enemies displayed on the screen using these pixel shaders, there is a noticable delay. We had the same problem in 'Army of the Damned'. Pieter wrote a little 'LOD' system which switches shaders on enemy models. They switch between the regular shader and the pixel shader. This speds up the game a lot and is barely noticable (visual wise) for the user. Since we had the same issues in the robot shooter I took Pieter's system and made it work with the robots. This, as expected, improved the peformance.
There are some drawbacks though. The system in this example uses 'distance to the camera' checks to know what to do. Distance checks can be expensive too, and sometimes can be even more expensive than just rendering extra polygons or models with a bit more complex shaders. But keep in mind that these LOD systems don't require to be updated every frame, which can also speed things up. It is all about finding the balance between direct optimalizations and LOD systems.
The last couple of weeks we are very busy completing some of our bigger projects.
And because I think they all deserve a lot of attention and everyone should play them, I like to update you on our latest releases.
Army of the Damned First of all there is Army of the Damned, the first person zombie shooter that many of us already have written about. The game was released on August 10th in two editions: a less gory version on Shockwave.com and a bloody version on AddictingGames.com.
Check the Army of the Damned official trailer:
And you can play the game here. (Don't worry, it's a link to the bloody version!)
Red Bull Formula Face Secondly, last week Red Bull Formula Face (our super secret project) was launched.
A game totally different then our zombie shooter, because you won't see any blood. And it's not just a kart racing game. It's a kart racing game with mimic tracking! Yes, you have to control the game with your face.
Of course, we alse made a trailer for this one:
And don't forget to play at RedBullFormulaFace.com. Robot Shooter As third, we are working on a Robot Shooter. You can scroll down this page for some preview images. This game isn't released yet, but we work hard to bring you this awesome free online shooter as soon as possible. You may expect this new game in a few weeks.
Between all our busy schedules we still found a little time for a trip to Cologne, to visit Gamescom. It was a long, long, but really great day! With a lot of games. And beer!
The last post by Pieter was also about particles, but as I'm working with different software we have to redo some of the particle work. I'll go a bit deeper into the details of the implementation.
First of all a particle is a simple quad (but in general doesn't have to be) which always faces the camera. To make particles always face the camera we could calculate the transform needed for it to exactly face the camera. But doing this for all particles on screen is a bit expensive. Instead we simply take the rotation values of the camera and apply it to all particles. The effect of this is that not all particles are exactly facing the camera but they are roughly and the difference is not really noticable and it's a lot cheaper CPU-wise.
Second, the spawning and deleting of particles is expensive. Instead we're using a particle pool. In this particle pool there are only unused particles (not in the scene). Whenever we need to spawn a particle we take it from the particle pool, assign properties and add it to the scene. When the particle has to be removed, we're not going to delete it, but we return it to the particle pool. In this way we avoid the expensive operation of spawning and deleting particles.
Third, particles often fade out by using changing the alpha (transparency). Currently the only way we can change the alpha is by changing the material. In this case it would mean we cannot share the material across particles as changing the alpha of one particle would change the alpha of all particles. Using one material per particle would be possible but is very expensive as per material it requires shader program switches on the GPU. So we want one material for all particles but still change the alpha per particle, what now? Well, we can still change the UV coordinates of the particle (quad) and have different images with different alpha settings. We do this by using one large image which has several smaller images in it, see image below. For the first image we change the UV Coordinates to be between 0 and 0.125 (on the 'x' axis), for the second image between 0.125 and 0.25, etc. This functionality is also useful for animation.
For our latest game we wanted to create an impressive looking start screen where a camera moves around the main character in a "frozen" 3D environment. We wanted the environment to look detailed with lots of enemies and action going on, but we also wanted to keep the file-size small and complexability low to keep the downloadtime short and system performance high.
We tackled these issues by creating a scene where only the main character and some small effects are true 3D models and where the rest of the environment is displayed as a panoramic texture mapped onto a sphere.
A panoramic texture can easily be rendered in 3ds Max using the Panorama Exporter which can be found in the Utilities panel. The result is a distorted looking image which looks normal when mapped onto a sphere and when viewed from the spheres center. The images below display the rendered panorama image and the Photoshop edit which was used for the final scene.
The next image displays the final 3D scene for the start screen.
Here the panoramic texture has been mapped onto a sphere, the spheres bottom has been flattened so it won't look like the 3D character is hoovering above the floor. A plane with the characters shadow is placed below the character to make it fit better into the scene. There are also some extra objects like bullet streaks, impacts and a big muzzle flash coming from the characters gun which exaggerate the 3D effect when moving the camera. The cameras cannot be moved outside of the sphere and moving the cameras closer to the center results in less distortion of the panoramic image.
During the development of Army of the Damned we also started another first person shooter project. The plan is to create a similar game like the zombie game, but with a more arcade type of gameplay and graphics. Today I want to talk about how we are going to do the 'Shooting' in this game. You might think, 'Well it is a first person shooter just like all the others, so what is the point of discussing this?', which in fact is pretty much true. But what we want to do is make all of the bullets visible. Not just instant hits, as we did in the zombie game. The main reason for this is to amplify the arcade feel of the game. It also changes the experience slightly, because it takes a slight amount of time for the bullet to hit it's target.
The technical difficulty of these visual bullets doesn't come with the bullets themselves. They just function on their own. When spawned they move forwards, if they hit something they die. And while a bullet is 'a life', it is visible to the player.
The problem comes when shooting the bullets, or better said, spawning the bullets, from the first person perspective. Normally what you can do to 'shoot' from a first person camera, is just to shoot a ray down the center of the camera's transform into the 3D world. If it hits anything create a bullet hole, hit an enemy or something else depending on what the ray hits. But when having visual bullets, and a visual weapon in view where the bullet appears to be coming from it isn't that simple.
This figure shows our problem:
If we just spawn a bullet at the end of the weapon's barrel, and shoot it in the direction the barrel is facing it will never get to the target the player's aiming for. It does go in the correct direction in general, but this will be unusable when having targets on a decent distance. It will also look very strange because the fired bullets won't move towards the displayed crosshair in the interface, which makes the crosshair in fact pretty useless.
The solution is to shoot a ray first from the camera, the same way you would do when shooting 'directly'. This should give you some sort of intersection point in 3d space. Then it is time to cheat a little. The bullet we are about to create should spawn at the end of the barrel, but not be pointed in the same direction as the barrel. Instead it should be pointed at the intersection point we got from the ray. This will make sure that bullets always travel towards the target or object the player is aiming at. It will look correct because the bullets will always move towards the crosshair in 3D space.
The only problem occours when the first ray fails. We don't have a reference point. A simple but yet effective solution to this problem is to calculate a intersection point far a way from the camera. And then point the bullet to that new location.