donderdag 22 september 2011

Level of detail


This week I worked on some bugs of the robot shooter. There was a descent list of fixes, tweaks and optimalizations after the first QA session. The last one, optimalization is what I want to talk about today. In this case I want to look into simple, or high level optimalizations.

First some theory to start with. Games in general are rendered realtime to your screen and displayed using 'pixels'. Imagine having a 3D model displayed close to the camera. It fills up a lot of pixels with its shape, texture and polygons, because it is relatively close to the camera. We could say that how closer the 3D model is towards the camera, the more pixels it uses to display itself. Since it uses so many pixels, we are able to see all of the details of the model.

Now, when moving the 3D model away from the camera, it eats up less pixels to draw itself. Sounds logic right? This means that a single pixel on our display covers up some of the detail we have in the 3D model. We could say that the model is less detailed displayed than it actually is. While it is still being processed the sameway, with all of its details. Which actually costs performance. Therefor we could replace the model by lower resolution version of itself, if the model is on a certain distance. A system like this could be called a 'LOD', or 'Level Of Detail', system. 
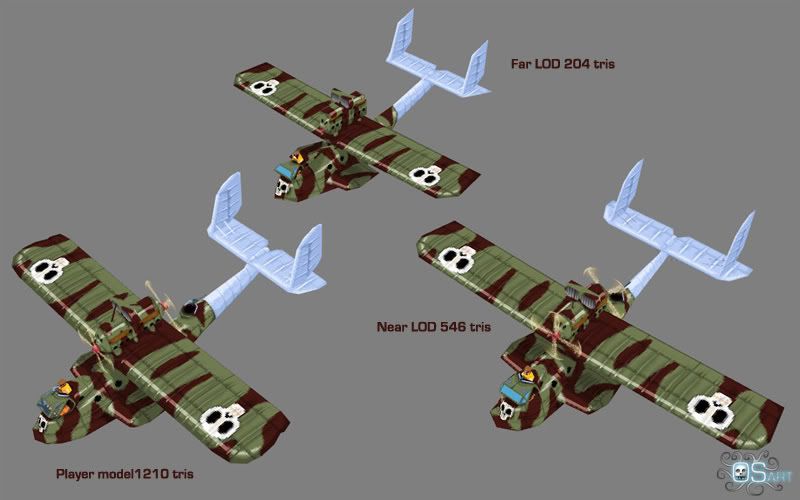

Model and image by Owen Shepherds
In our robot shooter it is possible to turn on pixel shaders, which is render bit slower than the regular hardware shaders. In fact, when playing with a descent amount of enemies displayed on the screen using these pixel shaders, there is a noticable delay. We had the same problem in 'Army of the Damned'. Pieter wrote a little 'LOD' system which switches shaders on enemy models. They switch between the regular shader and the pixel shader. This speds up the game a lot and is barely noticable (visual wise) for the user. Since we had the same issues in the robot shooter I took Pieter's system and made it work with the robots. This, as expected, improved the peformance.


There are some drawbacks though. The system in this example uses 'distance to the camera' checks to know what to do. Distance checks can be expensive too, and sometimes can be even more expensive than just rendering extra polygons or models with a bit more complex shaders. But keep in mind that these LOD systems don't require to be updated every frame, which can also speed things up. It is all about finding the balance between direct optimalizations and LOD systems.


-Joep


vrijdag 9 september 2011

Xform Games - Gotta play 'em all

Hi all,

The last couple of weeks we are very busy completing some of our bigger projects.
And because I think they all deserve a lot of attention and everyone should play them, I like to update you on our latest releases.


Army of the Damned
First of all there is Army of the Damned, the first person zombie shooter that many of us already have written about. The game was released on August 10th in two editions: a less gory version on Shockwave.com and a bloody version on AddictingGames.com. 

Check the Army of the Damned official trailer:


And you can play the game here. (Don't worry, it's a link to the bloody version!)

Red Bull Formula Face 
Secondly, last week Red Bull Formula Face (our super secret project) was launched.
A game totally different then our zombie shooter, because you won't see any blood. And it's not just a kart racing game. It's a kart racing game with mimic tracking! Yes, you have to
 control the game with your face. 

Of course, we alse made a trailer for this one:


And don't forget to play at RedBullFormulaFace.com.

Robot Shooter

As third, we are working on a Robot Shooter. You can scroll down this page for some preview images. This game isn't released yet, but we work hard to bring you this awesome free online shooter as soon as possible. You may expect this new game in a few weeks.

Between all our busy schedules we still found a little time for a trip to Cologne, to visit Gamescom. It was a long, long, but really great day! With a lot of games. And beer!

Grüße aus Köln!

- Shirley

Particles again!

Dear readers,

The last post by Pieter was also about particles, but as I'm working with different software we have to redo some of the particle work. I'll go a bit deeper into the details of the implementation.

First of all a particle is a simple quad (but in general doesn't have to be) which always faces the camera. To make particles always face the camera we could calculate the transform needed for it to exactly face the camera. But doing this for all particles on screen is a bit expensive. Instead we simply take the rotation values of the camera and apply it to all particles. The effect of this is that not all particles are exactly facing the camera but they are roughly and the difference is not really noticable and it's a lot cheaper CPU-wise.

Second, the spawning and deleting of particles is expensive. Instead we're using a particle pool. In this particle pool there are only unused particles (not in the scene). Whenever we need to spawn a particle we take it from the particle pool, assign properties and add it to the scene. When the particle has to be removed, we're not going to delete it, but we return it to the particle pool. In this way we avoid the expensive operation of spawning and deleting particles.

Third, particles often fade out by using changing the alpha (transparency). Currently the only way we can change the alpha is by changing the material. In this case it would mean we cannot share the material across particles as changing the alpha of one particle would change the alpha of all particles. Using one material per particle would be possible but is very expensive as per material it requires shader program switches on the GPU. So we want one material for all particles but still change the alpha per particle, what now? Well, we can still change the UV coordinates of the particle (quad) and have different images with different alpha settings. We do this by using one large image which has several smaller images in it, see image below. For the first image we change the UV Coordinates to be between 0 and 0.125 (on the 'x' axis), for the second image between 0.125 and 0.25, etc. This functionality is also useful for animation.


Until next time!
-- Stijn

maandag 5 september 2011

Faking a complex 3D background


For our latest game we wanted to create an impressive looking start screen where a camera moves around the main character in a "frozen" 3D environment. We wanted the environment to look detailed with lots of enemies and action going on, but we also wanted to keep the file-size small and complexability low to keep the downloadtime short and system performance high.
We tackled these issues by creating a scene where only the main character and some small effects are true 3D models and where the rest of the environment is displayed as a panoramic texture mapped onto a sphere.

A panoramic texture can easily be rendered in 3ds Max using the Panorama Exporter which can be found in the Utilities panel. The result is a distorted looking image which looks normal when mapped onto a sphere and when viewed from the spheres center. The images below display the rendered panorama image and the Photoshop edit which was used for the final scene.


 The next image displays the final 3D scene for the start screen. 


Here the panoramic texture has been mapped onto a sphere, the spheres bottom has been flattened so it won't look like the 3D character is hoovering above the floor. A plane with the characters shadow is placed below the character to make it fit better into the scene. There are also some extra objects like bullet streaks, impacts and a big muzzle flash coming from the characters gun which exaggerate the 3D effect when moving the camera. The cameras cannot be moved outside of the sphere and moving the cameras closer to the center results in less distortion of the panoramic image.

Here are some screens of the final result.


Cheers Matt

woensdag 24 augustus 2011

Technical Talk

During the development of Army of the Damned we also started another first person shooter project. The plan is to create a similar game like the zombie game, but with a more arcade type of gameplay and graphics. Today I want to talk about how we are going to do the 'Shooting' in this game. You might think, 'Well it is a first person shooter just like all the others, so what is the point of discussing this?', which in fact is pretty much true. But what we want to do is make all of the bullets visible. Not just instant hits, as we did in the zombie game. The main reason for this is to amplify the arcade feel of the game. It also changes the experience slightly, because it takes a slight amount of time for the bullet to hit it's target.

The technical difficulty of these visual bullets doesn't come with the bullets themselves. They just function on their own. When spawned they move forwards, if they hit something they die. And while a bullet is 'a life', it is visible to the player.
The problem comes when shooting the bullets, or better said, spawning the bullets, from the first person perspective. Normally what you can do to 'shoot' from a first person camera, is just to shoot a ray down the center of the camera's transform into the 3D world. If it hits anything create a bullet hole, hit an enemy or something else depending on what the ray hits. But when having visual bullets, and a visual weapon in view where the bullet appears to be coming from it isn't that simple.


This figure shows our problem:

If we just spawn a bullet at the end of the weapon's barrel, and shoot it in the direction the barrel is facing it will never get to the target the player's aiming for. It does go in the correct direction in general, but this will be unusable when having targets on a decent distance. It will also look very strange because the fired bullets won't move towards the displayed crosshair in the interface, which makes the crosshair in fact pretty useless.

The solution is to shoot a ray first from the camera, the same way you would do when shooting 'directly'. This should give you some sort of intersection point in 3d space. Then it is time to cheat a little. The bullet we are about to create should spawn at the end of the barrel, but not be pointed in the same direction as the barrel. Instead it should be pointed at the intersection point we got from the ray. This will make sure that bullets always travel towards the target or object the player is aiming at. It will look correct because the bullets will always move towards the crosshair in 3D space.

The only problem occours when the first ray fails. We don't have a reference point. A simple but yet effective solution to this problem is to calculate a intersection point far a way from the camera. And then point the bullet to that new location.

Until next time,

-Joep

vrijdag 5 augustus 2011

Pimping art for stills and print


The past week we've been finalizing our zombie shooter "Army of the Damned". At this stage we need to prepare the artwork for marketing and print purposes, which of course has to look much better then in-game screenshots or standard renders and also must have a much higher resolution. Luckily I took this into account when creating the game's main menu which in-game is displayed at a resolution of 800x450. For this image I tripled the size to 2400x1350 pixels, which is more then enough for what we want to do with it.  
It's always good to figure out what you want to achieve with the image before starting on the artwork, this will keep you from creating art which in the end you don't need.

For this image I wanted to show a detailed player character, some zombies closing in on him and a plane dropping a bomb in the background while keeping in mind the title and menu would be displayed on top. I also wanted the image to have a grindhouse look. After some quick layout sketches I posed the 3D characters and rendered an image which can be seen below.


As you might have noticed the rendered image looks a bit bland, the big zombie on the left has too little contrast and there is no clear light-source, no problem we're going to fix all this in Photoshop!
First we need to determine where the light comes from, in this case most of it will come from the explosion in the background. In Photoshop I placed a layer on top of the character where I painted the lit areas with an orange color and set the layer to color dodge. 
On another layer I painted the shadow area's with a dark color and set the layer to multiply.

Next I added the background which is composed out of a sky, mountain, plane and explosion image. I also added some smoke coming form the gun muzzle. 


The image is getting there but it still looks too clean and the background looks too detached from the foreground. First I added some noise on top of the image and a "scratched film" layer to make the whole thing look old.

When you look closely you might notice the left side of the image has a red hue and the right side a green hue (red=bad guys, green=good guy). This is achieved by adding layer on top set to color dodge (of soft light) and lightly using a red and green brush. 
Finally I placed another layer on top which is set to overlay, with a white brush I painted over the area's which needed to be more brightly lit. These where mainly the explosion area and the players chest.

So that's how you pimp an image!

Cheers, Matt


woensdag 27 juli 2011

The zombies are coming..

Hello!

Time for another blogpost today. First of all I want to bring some good news.. Our zombie shooter is nearing completion, it is almost done! Last week we did some playtesting to find and fix bugs and glitches. But we actually couldn't stop playing the game itself! Stay tuned, the trailer is coming soon ;)


Screenshot Zombie Shooter


The playtesting, or QA (Quality Assurance), is very important. A game, when released, should work. And not just be filled with bugs. During this process bugs are found and listed to be fixed after the QA session. If someone encounters a bug while testing. He or she creates a so called 'QA Ticket'. The bug or glitch is explained in the description of the ticket and also the steps to reproduce the bug are written down. This in particulary is important, because the programmer who's going to fix the bug can reproduce it for debugging. Imagine something very simple like this:

Problem: The sound isn't muted when pressing 'Mute Sound' in the options menu.

Procedure: 1. Start the game 2. Go to the 'Options' screen 3. Clik the 'Mute Sound' button.

This is a straight forward bug, and probably not so hard to find and fix. Bugs that occour during gameplay are much thougher to reproduce. Sometimes the player needs to be at a specific location within the game world. If so, we add a screenshot to the 'QA Ticket'. So the programmer can go to that location in-game, and follow the steps to reproduce the bug. Instead of starting a process of 'Trial and error' just to reproduce the bug in the first place.

The next step is to fix the bugs ofcourse. First the blocker ones, the bugs that cause game freeze's or prevent the player from making progress. What I mean by 'Making process'; A gate for example that should open after some actions, and it doesn't. The player is then not able to walk through it towards the end of the level, and thus not able to finish the level. Then the other critical bugs are fixed. Such as sound/music bugs, graphic issues, getting behind the boundaries of a game level where the player shouldn't be etc.


If the blocker and critical bugs are fixed, a new QA session is behing held. The QA process starts again until the game is ready for release.


Happy QA'ing ;)!

-Joep